A wooden wishing well Planter


A wooden wishing well planter adds storybook charm and rustic beauty to your garden or yard. Styled like a classic village well, this planter gives your flowers or trailing plants a unique vertical presentation while doubling as an enchanting garden feature.


Why Make a Wooden Wishing Well Planter?

It’s more than just a planter—it’s a centerpiece. The wishing well design brings a sense of whimsy and nostalgia, making it ideal for cottage gardens, backyard corners, or entryways. Plus, it offers vertical interest and works beautifully with cascading plants.


General Steps to Build a Wooden Wishing Well Planter

  1. Select the Wood – Use weather-resistant wood like cedar, redwood, or pressure-treated pine.

  2. Build the Base Planter – Create a hexagon, octagon, or circular base planter box to act as the “well.”

  3. Add Upright Posts – Attach two vertical posts to support the roof structure.

  4. Construct the Roof – Build a pitched roof using small planks or shingles for a classic look.

  5. Add Decorative Elements – Include a faux crank, bucket, or rope for authenticity.

  6. Finish and Protect – Sand, stain, or paint, then seal with an outdoor weatherproof finish.


Creative Ideas for the Wishing Well Planter

  • Trailing Plants – Use petunias, ivy, or creeping Jenny to spill over the sides like water.

  • Engraved Wishes – Add a wooden plaque with quotes or personalized family names.

  • Mini Fairy Garden – Turn the base into a fairy village scene with tiny accessories.

  • Themed Roof – Paint the roof in a fun pattern or seasonal theme.

  • LED Lights – Install solar fairy lights to make it glow at night.


Conclusion

A wooden wishing well planter brings magic and charm to any outdoor space. Whether you use it for blooming flowers or trailing vines, it’s a stunning statement piece that makes your garden feel like a fairytale.

Wooden train garden planter


A wooden train garden planter brings a fun, adventurous spirit to your outdoor space. Designed like a charming locomotive with several connected cars, this planter can hold colorful flowers, herbs, or small shrubs along a "track" through your garden.


Why Make a Wooden Train Garden Planter?

It’s a wonderful way to combine gardening with creativity. Perfect for family gardens, children’s areas, or simply to add a unique talking point, the train planter turns a simple garden into a lively, story-filled landscape.


General Steps to Build a Train Garden Planter

  1. Select the Wood – Choose durable, outdoor-friendly wood like cedar or treated pine.

  2. Build the Engine and Cars – Create basic rectangular boxes for each car and a slightly taller box for the engine.

  3. Add Wheels – Attach small wooden circles as decorative wheels to each planter box.

  4. Connect the Cars – Place the planters in a row with optional small links between them.

  5. Detail the Train – Add a chimney for the engine and small accents like windows or trim.

  6. Finish and Protect – Sand well and apply outdoor paint or weatherproof sealant.


Creative Ideas for the Train Planter

  • Themed Gardens – Assign each car a different flower color or type (like a rainbow train!).

  • Name Your Train – Personalize with a name like “Garden Express” or your family name.

  • Miniature Details – Add tiny figures, tracks, or a station sign nearby.

  • Holiday Decorations – Decorate the train planter with festive ornaments through the seasons.

  • Vary the Car Size – Mix short and tall cars for dynamic planting options.


Conclusion

A wooden train garden planter makes gardening even more fun, inviting creativity and joy into any outdoor area. Whether you're a train enthusiast or just love imaginative projects, this planter will have your garden right on track for beauty and smiles.

Wooden Planter Tricycle Shape Flower Bucket

A wooden planter tricycle shape flower bucket combines creativity and charm, making it a standout piece in your garden, patio, or even indoors. With a rustic or playful style, this project features a classic tricycle form holding a bucket of vibrant flowers.


Why Make a Wooden Planter Tricycle Shape Flower Bucket?

It’s perfect for those who want to add a nostalgic, storybook feeling to their space. The tricycle design adds motion and life to a flower arrangement, making your plants look like they're ready for a scenic ride.


General Steps to Build a Planter Tricycle

  1. Choose the Wood – Lightweight yet sturdy wood like pine or cedar works well.

  2. Create the Wheels – Cut three round wooden wheels or use ready-made wooden circles.

  3. Build the Frame – Form a simple tricycle frame with wooden dowels and a central support.

  4. Attach the Bucket Holder – Build or attach a circular or square holder for the flower bucket.

  5. Assemble the Pieces – Connect the wheels, frame, and flower holder securely.

  6. Finish and Decorate – Sand smooth, stain or paint, and add any decorative accents you like.


Creative Ideas for the Tricycle Planter

  • Vintage Look – Distress the wood finish for an antique tricycle feel.

  • Bright Colors – Paint in bold colors for a playful garden accent.

  • Mini Version – Create smaller tricycle planters for tabletops.

  • Holiday Themes – Decorate for seasons like spring blooms or festive winter greens.

  • Double Bucket – Add a second flower bucket in the back for a fuller display.


Conclusion

A wooden planter tricycle shape flower bucket is a heartwarming way to showcase flowers with a sense of motion and whimsy. Whether rustic or colorful, it's sure to brighten any space and make your garden even more inviting. 

Wooden dog-shaped planter


A wooden dog-shaped planter is a charming and whimsical project that adds personality to your garden, porch, or indoor space. Designed to look like a cute pup, this planter holds your favorite flowers or greenery in a fun, functional form.


Why Make a Wooden Dog-Shaped Planter?

It’s the perfect project for pet lovers or anyone looking to add a lighthearted touch to their plant display. Whether rustic or modern in style, it’s a conversation starter and a joyful decorative piece for any setting.


General Steps to Build a Dog-Shaped Planter

  1. Choose the Wood – Use weather-resistant wood like cedar or redwood for outdoor use.

  2. Design the Shape – Sketch or print a dog silhouette or 3D body with a hollow back section.

  3. Cut the Parts – Make pieces for the head, body (box), legs, tail, and ears.

  4. Assemble the Body – Build a sturdy rectangular planter box as the dog’s torso.

  5. Attach the Features – Add legs, head, ears, and tail to complete the dog shape.

  6. Finish and Seal – Sand smooth and apply paint or sealant for durability.


Creative Ideas for Your Dog Planter

  • Breed-Inspired Design – Shape it like your favorite dog breed, from dachshund to corgi.

  • Add a Collar – Paint or add a mini tag for extra detail.

  • Painted Details – Use paint for eyes, paws, and a cute nose.

  • Herb Garden Pup – Grow herbs like basil or mint in the dog’s back.

  • Name It! – Personalize with your dog’s name on the side.


Conclusion

A wooden dog-shaped planter brings joy to both plant lovers and dog lovers alike. It’s a creative way to express your personality and green thumb in one delightful piece. 

Minimal wooden planter cart

A minimal wooden planter cart is a clean, modern way to showcase your favorite plants while adding mobility and charm to your space. With smooth lines, natural wood tones, and functional wheels, it blends form and function—perfect for patios, balconies, or indoor corners.


Why Make a Minimal Wooden Planter Cart?

This project is ideal for plant lovers who want both beauty and flexibility. It lets you move your plants easily for better sunlight or cleaning, while keeping everything organized in a sleek, understated design.


General Steps to Build a Minimal Wooden Planter Cart

  1. Select the Wood – Use weather-friendly wood like cedar or treated pine if the cart will be outdoors.

  2. Build the Base Frame – Create a rectangular base with slats or a solid board to hold planters securely.

  3. Add Vertical Edges – Add low rails or clean-sided panels to give the cart structure without bulk.

  4. Install Wheels – Attach four caster wheels—two with locks—for mobility and stability.

  5. Finish It Up – Sand all edges and seal with a matte or natural finish to highlight the wood grain.


Creative Ideas for the Planter Cart

  • Two-Tier Version – Add a second shelf underneath for tools or smaller pots.

  • Handlebar Option – Include a simple wood bar on one side for easy pulling.

  • Compact Design – Make a smaller version for tight spaces or herbs only.

  • Color Pop – Paint the wheels or inner panels for a modern twist.

  • Plant Labels – Add minimalist wooden tags to label each pot or section.


Conclusion

A minimal wooden planter cart is a stylish and practical way to organize your greenery. Whether you're a seasoned gardener or just getting started, this project adds mobility and elegance to your plant setup.

Wooden tray stacked for organization

A wooden stacked tray organizer is a sleek and practical solution for decluttering desks, countertops, or shelves. With a tiered design, it helps you sort papers, supplies, accessories, or even kitchen items—keeping everything within reach while saving space.


Why Make a Wooden Stacked Tray Organizer?

This project is perfect for those who love tidy spaces with a natural touch. It's a beginner-friendly build that brings both function and beauty into your home or office. Plus, it can be customized to match your style, whether modern, rustic, or minimalist.


General Steps to Build a Stacked Tray Organizer

  1. Pick the Right Wood – Use lightweight wood like pine or plywood for easier handling.

  2. Cut the Trays – Make two or three rectangular trays, depending on your desired stack height.

  3. Create the Frame – Add vertical supports or angled spacers between trays to allow easy access.

  4. Assemble the Stack – Attach trays to the supports securely, ensuring enough space between layers.

  5. Finish the Surface – Sand smooth and apply stain, paint, or clear coat for protection and style.


Creative Ideas for Stacked Trays

  • Angled Fronts – Make each tray slightly tilted for better visibility.

  • Label Holders – Add metal or wood label slots to organize by category.

  • Color Accents – Paint the inside of each tray a different color for a fun look.

  • Adjustable Layers – Use pegs or dowels so you can rearrange the trays later.

  • Use for Crafts or Kitchen – Perfect for sewing supplies, coffee pods, or spices!


Conclusion

A stacked wooden tray organizer brings structure and charm to your everyday storage needs. Whether for your desk, kitchen, or entryway, it’s a quick, useful woodworking project that brings order in style.

Wooden Bird house and feeder


A wooden bird house and feeder is the perfect outdoor project that brings charm to your garden and provides shelter and food for local birds. Combining function with rustic beauty, this project is ideal for nature lovers who enjoy watching wildlife up close.


Why Make a Wooden Bird House and Feeder?

Building a bird house and feeder supports local wildlife while adding a handmade touch to your outdoor space. It's a great weekend project for beginners or families, and it brings year-round enjoyment as birds come and go.


General Steps to Build a Wooden Bird House and Feeder

  1. Choose the Right Wood – Cedar or pine are great options—durable, weather-resistant, and safe for birds.

  2. Design the Structure – Combine a small nesting space (with an entrance hole) and a tray or platform for feeding.

  3. Cut the Pieces – Prepare panels for the walls, roof, floor, and feeding platform.

  4. Assemble the House – Nail or screw the parts together, leaving a removable roof or panel for cleaning.

  5. Add the Feeder – Attach a platform or hanging bowl under or beside the house.

  6. Finish Safely – Sand edges and use bird-safe finishes if needed. Avoid toxic paints or sealants.

  7. Mount It – Hang from a tree or post, or mount on a pole in your yard.


Creative Ideas for Bird House and Feeder Design

  • Dual-Level Structure – Add a roofed feeding platform below the bird house for a cozy, layered look.

  • Nature-Inspired Decor – Carve or paint leaves, flowers, or birds for decoration.

  • Observation Window – Add a small clear panel on the back for discreet bird watching.

  • Upcycled Add-ons – Use an old teacup or bowl as the feeder dish.

  • Painted Roof – Add a splash of color to the roof for extra visual interest.


Conclusion

A wooden bird house and feeder is a rewarding DIY that benefits both your garden and your local wildlife. It’s simple, customizable, and brings joy with every visiting chirp.

Wooden Jigsaw Puzzle Wall Clock

A wooden jigsaw puzzle wall clock is a fun and eye-catching decor piece that blends creativity with functionality. Designed to resemble interlocking puzzle pieces, this clock adds a playful and unique element to any wall—perfect for game rooms, kids’ rooms, or anyone who enjoys puzzles and craftsmanship.


Why Make a Wooden Jigsaw Puzzle Clock?

This project is ideal for puzzle lovers or those looking to build a statement wall clock with a creative flair. The interlocking pieces offer a chance to personalize the shape, size, and layout, making it as quirky or minimalist as you like.


General Steps to Make a Wooden Jigsaw Puzzle Clock

  1. Choose the Wood – Use light or medium-density wood such as birch, pine, or MDF for easier cutting.

  2. Create a Puzzle Design – Sketch or print puzzle piece outlines that fit together to form a circle or square.

  3. Cut the Pieces – Use a scroll saw or laser cutter to create the individual puzzle segments.

  4. Assemble and Glue – Fit the pieces together and glue them to a backing board for stability.

  5. Add Clock Mechanism – Drill a center hole and install a clock movement kit with bold hands.

  6. Finish – Sand and apply paint, stain, or a natural finish. You can even paint the pieces in different colors.


Creative Ideas for the Puzzle Clock

  • Color-Coded Segments – Paint each piece in a different shade to enhance the puzzle look.

  • Engrave Letters or Names – Customize with initials or family names on each piece.

  • Removable Pieces – Make one piece detachable for added interactivity.

  • Minimal Style – Keep it monochrome with natural wood grain for a sleek look.

  • Oversized Clock – Make a large wall version with more puzzle pieces for dramatic effect.


Conclusion

A wooden jigsaw puzzle wall clock is a delightful DIY project that lets you play with form, function, and personality all in one. It’s a fantastic conversation starter and a reminder that time can be both playful and handcrafted.

A minimalist wooden Mountain-Shaped wall clock


A minimalist wooden mountain-shaped wall clock brings the beauty of the outdoors into your home in a sleek, modern form. With clean lines and natural textures, this clock design is ideal for those who love mountain vibes but prefer a subtle, uncluttered look.


Why Make a Minimalist Wooden Mountain Wall Clock?

This project is perfect for combining function with art. It not only tells time but also acts as a calm, nature-inspired wall feature. Whether placed in a living room, office, or cabin, the mountain shape evokes tranquility and adventure in equal measure.


General Steps to Make a Minimalist Wooden Mountain Clock

  1. Select the Wood – Use solid wood like walnut or oak for rich grain and durability.

  2. Design the Shape – Sketch simple mountain peaks with geometric edges—no need for detailed carving.

  3. Cut the Silhouette – Use a jigsaw to cut the mountain shape from the board.

  4. Drill Clock Center – Mark the clock’s center on the flat surface and drill a hole for the mechanism.

  5. Add Clock Parts – Install a simple, silent clock movement with minimalist hands.

  6. Finish – Sand and apply oil or a clear matte finish to highlight the wood’s texture.


Creative Ideas for the Mountain Wall Clock

  • Two-Tone Peaks – Use lighter wood on top or white paint to mimic snowy caps.

  • Engraved Sun or Moon – Add a tiny sun or moon above the peaks for a dreamy effect.

  • Floating Mount – Create a floating look using a hidden wall mount.

  • Minimal Numerals – Use small engraved dots or no numbers at all for a true minimalist style.

  • Mountain Range Set – Make multiple pieces to form a panoramic wall set.


Conclusion

A minimalist wooden mountain wall clock is more than just a timepiece—it’s a peaceful nod to the wilderness, carved in clean, modern lines. A perfect project for lovers of nature, simplicity, and meaningful decor.

Wooden Dolphin Bookends


Wooden dolphin bookends combine functionality with playful, aquatic charm. Perfect for ocean lovers or kids' rooms, these bookends keep your books in place while adding a splash of character to your space. The dolphin’s sleek shape makes the design both eye-catching and soothing.


Why Make Wooden Dolphin Bookends?

Dolphins symbolize intelligence, joy, and freedom—making them a meaningful and delightful theme for any room. These bookends are a fun woodworking project that’s simple to build yet full of personality. They also make unique, heartfelt gifts.


General Steps to Build Wooden Dolphin Bookends

  1. Choose the Wood – Light woods like pine or maple work well and are easy to shape.

  2. Sketch the Dolphin Shape – Use a template or outline to trace two identical dolphins.

  3. Cut and Sand – Cut the shapes using a jigsaw or scroll saw, then smooth all edges.

  4. Build the Base and Back – Cut two L-shaped bookend bases and attach the dolphin figures.

  5. Finish It Off – Paint, stain, or leave natural; you can even add a wave base or ocean blue accents.


Creative Ideas for Dolphin Bookends

  • Jumping Pose – Make the dolphin appear mid-leap for dynamic motion.

  • Wave Detail – Carve or paint small waves under the dolphin for extra charm.

  • Personalized Base – Add a name or quote along the base.

  • Two Different Dolphins – Use different poses or sizes on each side for variety.

  • Nautical Theme Set – Pair with whale, anchor, or sea star bookends for a full ocean theme.


Conclusion

Wooden dolphin bookends are both practical and poetic—capturing the beauty of the sea while keeping your favorite reads in place. It’s a rewarding DIY project that brings a sense of calm and creativity to any bookshelf. 

Wooden Paw Pendant


A wooden paw pendant is a small yet meaningful project that captures the love we have for our furry friends. Whether worn as jewelry or gifted as a keepsake, this charming design brings warmth, nature, and sentiment together in one tiny piece of art.


Why Make a Wooden Paw Pendant?

This project is perfect for pet lovers who want a personal accessory with emotional value. It's lightweight, eco-friendly, and can be customized with initials, names, or dates. Great for everyday wear, gifts, or even pet memorials.


General Steps to Make a Wooden Paw Pendant

  1. Choose the Wood – Opt for hardwood like maple, cherry, or walnut for durability and fine grain.

  2. Draw or Trace a Paw Shape – Sketch a simple paw print with a round pad and four toes.

  3. Cut the Shape – Use a scroll saw or laser cutter for precision.

  4. Drill a Hole for the Cord – Add a small hole near the top for attaching a chain or string.

  5. Sand and Finish – Smooth the edges and apply oil or sealant to enhance the wood's natural tone.


Creative Ideas for a Wooden Paw Pendant

  • Engraved Name – Personalize with your pet’s name on the back.

  • Two-Tone Inlay – Use darker wood inlay for the paw pads.

  • Keychain Version – Make a slightly larger version for keys or bags.

  • Matching Set – Create a matching pendant and keyring set for you and your partner.

  • Natural Cord – Pair it with leather or hemp cord for a rustic look.


Conclusion

The wooden paw pendant is a small project with a big heart. It’s a perfect way to express your bond with pets through natural materials and handcrafted detail. 

Wooden oval-shaped coffee Table


A wooden oval-shaped coffee table blends functionality with soft, flowing aesthetics. Unlike traditional rectangular tables, the oval shape brings a sense of openness, making it ideal for smaller rooms or cozy corners. This project is a favorite for those who want a timeless, handcrafted centerpiece for their living area.


Why Make a Wooden Oval-Shaped Coffee Table?

Oval coffee tables are both stylish and practical. The curved edges improve movement around the table, especially in tight spaces, and are kid-friendly with no sharp corners. It’s perfect for displaying decor, serving drinks, or simply tying the room together with natural charm.


General Steps to Build a Wooden Oval-Shaped Coffee Table

  1. Choose the Wood – Oak, walnut, or birch offer strength and attractive grain patterns.

  2. Cut the Oval Top – Trace an oval using a string-and-pencil method or template, then cut using a jigsaw.

  3. Shape and Sand – Smooth the edges and round the corners for a clean, soft finish.

  4. Attach the Legs – Use angled wooden legs, tapered mid-century style, or a solid base depending on your design.

  5. Finish – Apply stain or clear coat to protect the wood and bring out its natural beauty.


Creative Ideas for a Wooden Oval Coffee Table

  • Two-Tone Design – Use contrasting wood for the legs and top for visual interest.

  • Hidden Storage – Add a shelf or hidden drawer under the tabletop for remotes or magazines.

  • Floating Look – Use slightly inset legs to create a floating appearance.

  • Engraved Center – Add subtle engraving or inlay in the center for a custom touch.

  • Rustic Twist – Use reclaimed wood with a distressed finish for a farmhouse vibe.


Conclusion

A wooden oval-shaped coffee table brings elegance, warmth, and a handcrafted touch to any space. Its soft lines and functional design make it a versatile addition to modern or rustic interiors.

Several Wood Block Wall Clock


A wood block wall clock turns time into art by arranging multiple blocks of wood into a creative and functional wall piece. These clocks are perfect for modern, rustic, or minimalist spaces. Whether you use equal-sized squares, offset rectangles, or a mix of wood tones, the result is a unique blend of structure and nature.


Why Make a Wood Block Wall Clock?

It’s simple, stylish, and endlessly customizable. Using individual blocks gives you design freedom—space them evenly, form a circle, or create an asymmetrical pattern. It’s also a great way to use scrap wood or experiment with grain and color variations.


General Steps to Build a Wood Block Wall Clock

  1. Choose Wood Pieces – Select blocks of the same or varying sizes; mix types like oak, walnut, and pine.

  2. Arrange the Layout – Plan the clock shape: grid, radial, zigzag, or freestyle.

  3. Attach a Clock Mechanism – Drill a hole in the center block and insert the clock movement.

  4. Fix the Blocks – Mount them on a backing board or directly on the wall.

  5. Add Finishing Touches – Sand, stain, or leave natural; use simple or stylized clock hands.


Creative Ideas for Several Wood Block Wall Clocks

  • Geometric Grid – Nine equal square blocks in a 3x3 pattern with the center holding the hands.

  • Floating Blocks – Mount blocks slightly apart on the wall with no backing for a 3D look.

  • Mixed Wood Species – Alternate light and dark woods to create contrast and depth.

  • Numbered Blocks – Use engraved or painted numbers on each block to highlight hours.

  • Minimalist Ring – Form a circular shape using just 12 blocks for the hours.


Conclusion

A wood block wall clock is more than a timepiece—it's a sculptural statement. Whether you're going for earthy elegance or modern minimalism, this project lets you play with pattern, texture, and time.

10 Wooden Creative Animal Wall Clock

Wooden wall clocks do more than tell time—they add warmth and charm to any space. When combined with adorable animal shapes, these clocks become playful, functional art pieces perfect for kids' rooms, nurseries, or anyone who loves a natural touch. Here are 10 wooden animal wall clock ideas that blend creativity with craftsmanship.


1. Wooden Koala Wall Clock


A sweet koala hugging a tree branch, this clock brings a peaceful vibe to the wall. Perfect for a baby’s room or a nature-themed space.

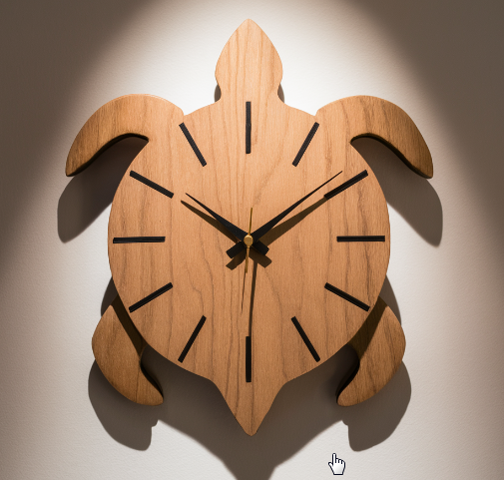
2. Wooden Turtle Wall Clock


With a gently curved shell and minimalist details, this turtle clock symbolizes calm and longevity while keeping your schedule in check.

3. Wooden Hedgehog Wall Clock


The spiky, circular silhouette of a hedgehog makes for a unique clock face. It adds a whimsical touch to cozy nooks or reading corners.

4. Wooden Elephant Wall Clock


Featuring a big-eared elephant with a gentle curve, this clock is both fun and grounding—a playful piece with strong visual presence.

5. Wooden Penguin Wall Clock


Charming and cool, the penguin design includes a rounded body and beak details that bring a smile. Ideal for winter-themed or cool-toned decor.

6. Wooden Lion Wall Clock


With its proud mane forming the outer circle, the lion wall clock is a bold and regal accent for children’s rooms or playful offices.

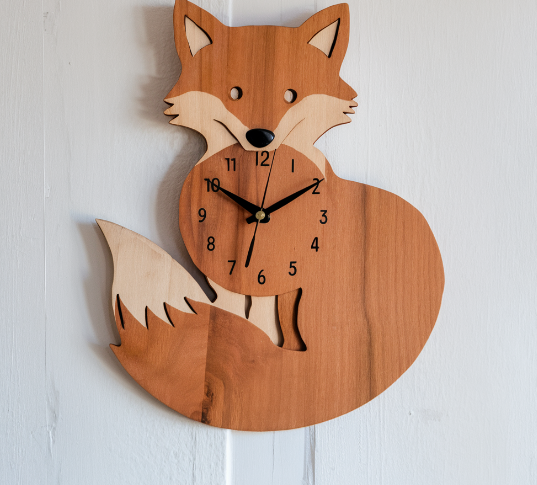
7. Wooden Fox Wall Clock


Sly and stylish, the fox clock features a curled tail design that subtly wraps around the numbers. A great fit for rustic-modern spaces.

8. Wooden Bear Wall Clock


Strong yet cuddly, this clock has a circular bear face and paw accents, making it a charming piece for cabins or animal lovers.

9. Wooden Shiba Wall Clock


Inspired by the popular dog breed, this clock uses the Shiba’s cheerful face and curled tail as design highlights. Perfect for pet-friendly homes.

10. Wooden Cat Wall Clock


With a curled sleeping cat or a sitting silhouette with a swinging tail as the pendulum, this design is pure purr-fection for feline fans.


Conclusion

These wooden animal wall clocks combine charm, personality, and natural texture to create joyful timepieces. Whether you're looking for something cute, clever, or calming, these animal designs turn every minute into a moment worth smiling at.

Wooden desk accessory with digital clock


A wooden desk accessory with a digital clock blends the beauty of natural wood with the convenience of modern technology. This project typically combines a clean wooden block or custom-shaped stand with a built-in digital display, making it both a practical timekeeper and a stylish desk ornament.

Why Make a Wooden Desk Accessory with Digital Clock?

This project is perfect for anyone who wants a natural, minimalist aesthetic on their desk without sacrificing function. It's a great gift idea for professionals, students, or anyone working from home. Plus, the warm texture of wood contrasts nicely with the sleek digital screen.

General Steps to Build a Wooden Desk Accessory with Digital Clock

  1. Choose the Wood – Use walnut, maple, or bamboo for a clean, modern look.

  2. Design the Form – Decide if it’s a simple block, angled stand, or multi-purpose design (e.g., clock + pen holder).

  3. Cut and Shape the Base – Use a saw and sander to form the wooden body.

  4. Create the Digital Clock Slot – Carve or route a compartment for a small digital clock module.

  5. Attach or Insert the Module – Fit the clock snugly; secure with glue or mounting hardware as needed.

  6. Optional Add-ons – Carve spaces for pens, paperclips, phone stand, or small drawer.

  7. Finish – Sand smooth and apply oil or a matte finish to highlight the wood grain.

Creative Ideas for a Wooden Desk Accessory with Digital Clock

  • Multifunction Base – Include compartments for keys, pens, and notes.

  • LED Display – Use a hidden display that shines through the wood veneer.

  • Wireless Charger Add-on – Combine clock with a wireless charging pad.

  • Geometric Design – Use slanted angles or hexagon shapes for a modern edge.

  • Personal Engraving – Add a name, quote, or company logo to personalize.

Conclusion

A wooden desk accessory with a digital clock is more than a timepiece—it’s a statement of style and smart design. Whether you're making it as a personal project or a unique gift, this piece brings warmth and utility to any workspace.

Wood Carved Human and His Dog

 A wood carved human and his dog sculpture is a touching piece of art that celebrates the timeless bond between humans and their loyal canine companions. Whether realistic or abstract, this carving captures the warmth, trust, and companionship that make dogs more than just pets—they're part of the family.

Why Make a Wood Carved Human and His Dog?

This project is perfect for honoring a beloved pet or simply expressing the deep connection between man and animal. It makes a meaningful gift, a memorial, or a unique decorative piece that tells a story of friendship. Wood’s natural texture enhances the emotional feel of the carving.

General Steps to Create a Wood Carved Human and His Dog

  1. Choose the Wood – Basswood or butternut is ideal for carving; hardwoods like walnut or cherry offer a refined look.

  2. Sketch the Design – Decide whether you want a realistic figure, a silhouette, or a stylized abstract form.

  3. Rough Carving – Use carving knives or chisels to shape the human figure and the dog. Focus on posture and connection (e.g., sitting side-by-side, walking, or the dog resting at the person’s feet).

  4. Add Details – Refine facial features, fur texture, and gestures like a hand on the dog’s head.

  5. Smooth and Finish – Sand gently and apply a finish such as oil, wax, or stain to enhance the wood grain and protect the carving.

  6. Optional Base – Mount it on a wooden base with an engraved nameplate or quote.

Creative Ideas for a Wood Carved Human and His Dog

  • Silhouette Style – A minimalistic profile of man and dog sitting together under a tree.

  • Memory Piece – Add a name and paw print of a real dog to personalize the carving.

  • Whittled Style – Use rough, rustic carving for a natural, old-world look.

  • Storytelling Base – Include extra elements like a leash, ball, or park bench to create a narrative scene.

  • Abstract Art – Create flowing, simplified forms to represent unity and movement.

Conclusion

A wood carved human and his dog sculpture is a timeless, heartfelt way to express loyalty, friendship, and love. Whether you keep it on a shelf or gift it to someone who adores their dog, this project is sure to carry emotional weight and artistic beauty.

Wooden Couple Holding Heart


A wooden couple holding heart sculpture is a heartwarming decorative piece that captures the essence of love, unity, and emotional connection. It features two simplified human figures—stylized or abstract—reaching toward or holding a heart between them. This beautiful wooden art makes a perfect handmade gift or a romantic decoration for the home.

Why Make a Wooden Couple Holding Heart?

This project is ideal for expressing love in a meaningful, visual way. It’s a touching gift for anniversaries, weddings, or Valentine’s Day. The piece radiates warmth and love, whether displayed on a desk, shelf, or bedside table. Plus, it allows room for personal creativity and wood artistry.

General Steps to Build a Wooden Couple Holding Heart

  1. Select the Right Wood – Choose a warm-toned hardwood like cherry, walnut, or teak for a rich finish.

  2. Sketch or Trace the Design – Draw two figures holding a heart, either as one connected piece or layered.

  3. Cut Out the Shapes – Use a scroll saw or bandsaw to cut the silhouette or puzzle-style shape.

  4. Sand and Shape – Smooth all edges, adding gentle curves and rounded corners for a soft look.

  5. Join or Balance the Piece – Secure the figures on a base if needed, or design it as a freestanding sculpture.

  6. Add Details (Optional) – Use wood burning or engraving to include names, a date, or a small quote.

  7. Finish the Wood – Apply natural oil or a clear matte finish to enhance the wood grain and protect the surface.

Creative Ideas for a Wooden Couple Holding Heart

  • Minimal Silhouette Style – Use abstract forms with a modern touch.

  • Interlocking Design – Make the heart removable or fitting into the couple's joined hands.

  • Layered Look – Create depth by layering wood pieces for a 3D effect.

  • Personalized Engraving – Add a meaningful message or initials on the heart.

  • Color Accents – Leave the figures in natural wood and paint the heart red for contrast.

Conclusion

A wooden couple holding heart is more than just décor—it’s a symbol of love, care, and shared life. With simple tools and heartfelt craftsmanship, you can create a piece that holds emotional value and artistic beauty. Want to pair it with a small wooden photo frame for a complete romantic set?

Wooden Couple Heart Keyring


A wooden couple heart keyring is a sweet, personal project that makes a meaningful gift for couples. Crafted from a single piece of wood split into two interlocking heart-shaped keyrings, it represents unity and connection. It’s small, sentimental, and perfect for anniversaries, Valentine’s Day, or just a simple “thinking of you” gesture.

Why Make a Wooden Couple Heart Keyring?

It’s a simple yet touching way to celebrate love. Whether you’re giving it to a partner or making it as a keepsake, this keyring adds emotional value to everyday objects. Plus, it's lightweight, durable, and customizable.

General Steps to Build a Wooden Couple Heart Keyring

  1. Select the Wood – Choose a smooth, easy-to-carve wood like cherry, maple, or walnut.

  2. Draw the Heart Shape – Sketch a heart that splits into two symmetrical halves.

  3. Cut and Sand – Carefully cut the heart into two parts and smooth the edges.

  4. Drill the Keyring Hole – Drill a small hole on each half for attaching keyrings.

  5. Personalize – Add initials, a date, or a tiny engraved message on each half.

  6. Finish – Apply natural oil, beeswax, or a light varnish for a polished look.

  7. Add Keyrings – Attach split rings or leather loops to complete the keychain.

Creative Ideas for a Wooden Couple Heart Keyring

  • Puzzle Piece Design – Make the heart halves fit together like a puzzle.

  • Engraved Coordinates – Add the location where you first met.

  • Minimalist Style – Keep the heart plain with just a smooth finish and simple engraving.

  • Two-Tone Wood – Use two different woods glued together for a contrast effect.

  • Add Magnets – Let the two halves snap together with small magnets inside.

Conclusion

A wooden couple heart keyring is more than just an accessory—it’s a token of love, handcrafted with care. Whether for yourself or someone special, it's a pocket-sized reminder of connection and closeness. Want it to be a gift box set or include a matching wood stand for display?