15 Creative Wooden Shelf Designs to Inspire Your Next DIY Project

Wooden shelves aren’t just for storage—they can be eye-catching art pieces that add personality to your space. Whether you're decorating a child's room, a cozy living area, or a creative workspace, these 15 creative wooden shelf designs offer both function and flair.

1. Wooden Bear Shape Shelf


A charming bear silhouette with small cubby holes—perfect for children’s rooms or woodland-themed décor.

2. Wooden Bus Shape Shelf
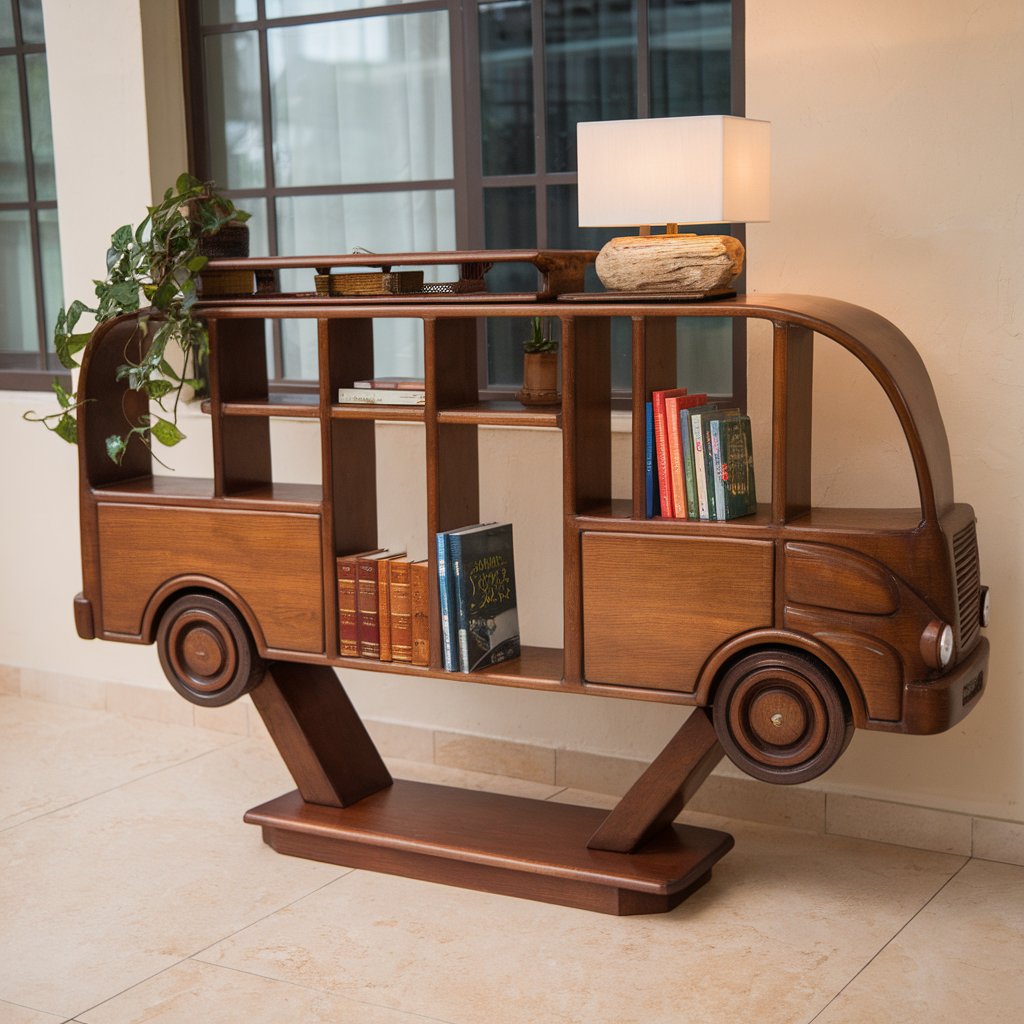


Designed like a classic bus, this shelf is great for toy displays or a playful storage piece in a kid's room or daycare.

3. Wooden Castle Shape Shelf


A fantasy-inspired shelf shaped like a castle—ideal for showcasing dolls, books, or little treasures.

4. Wooden Clover Shape Shelf


This lucky clover shelf adds a soft, rounded design that suits botanical or spring-themed interiors.

5. Wooden Guitar Shape Shelf


A musical shelf that doubles as wall art—perfect for music lovers to store small accessories or décor.

6. Wooden Hexagon Shelf


Geometric and trendy, hexagon shelves can be used solo or in clusters to create modular, modern displays.

7. Wooden Home Shape Shelf


A cozy home-outline frame with inner compartments—great for photos, keepsakes, or a hallway feature.

8. Wooden Ladder Shelf


Leaning or wall-mounted, this shelf offers tiered storage that’s great for plants, books, or decor items.

9. Wooden Leaf Shelf


Nature-inspired with soft curves, this shelf brings an organic and calming look to any room.

10. Wooden Moon with Hanging Star Shelf


A crescent moon design with a dangling wooden star—whimsical and perfect for nurseries or dreamy spaces.

11. Wooden Mountain Shelf


With pointed peaks and flat ridges, this shelf is a rustic favorite that adds adventure to any wall.

12. Wooden Stepping Shelf


Tiered like stairs, this shelf creates movement and is great for staggered displays or showcasing collections.

13. Wooden Tree Shape Shelf


Branching out with natural elegance, this shelf mimics a tree form—ideal for books or nature-themed décor.

14. Wooden Turtle Shape Shelf
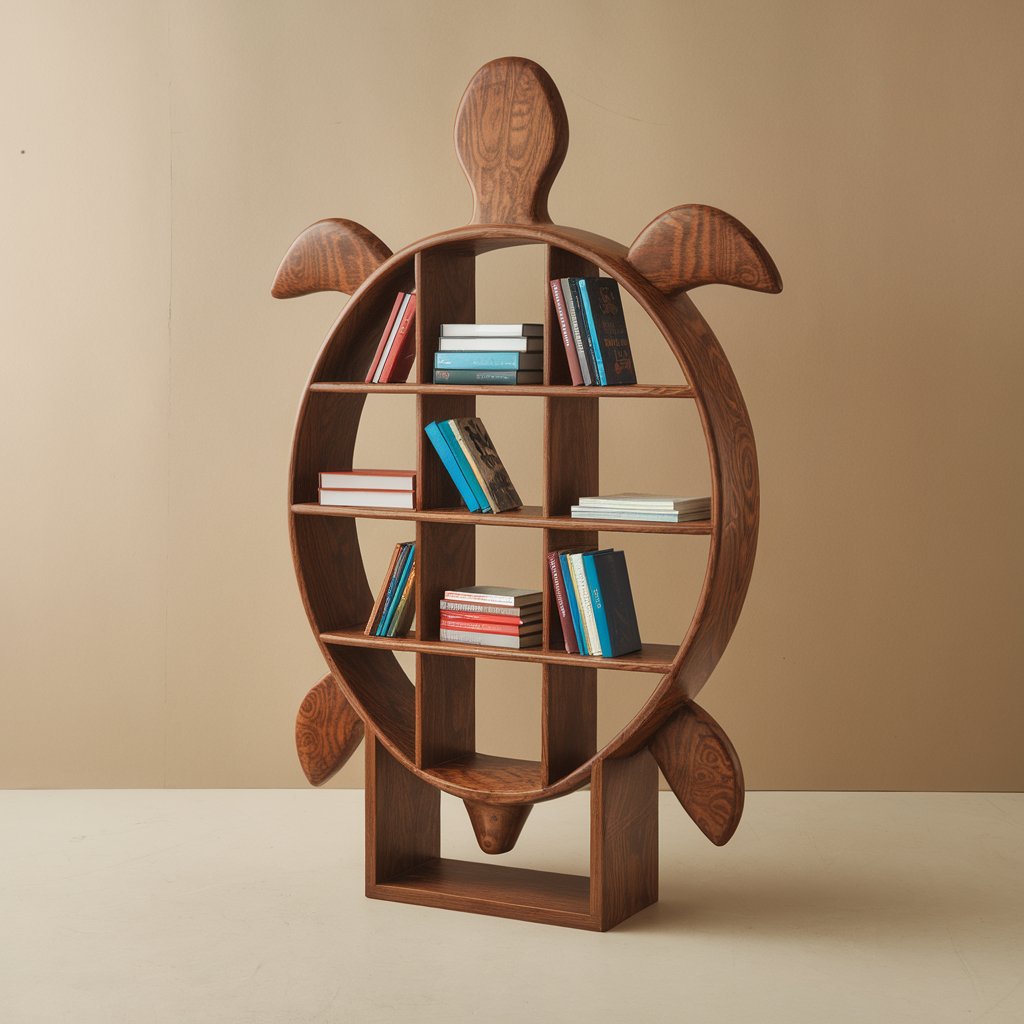


Fun and functional, the turtle design is perfect for beach houses or ocean-themed kids' rooms.

15. Wooden Wave Shelf


With flowing curves like ocean waves, this shelf adds a fluid, calming energy to the space.


Each design brings its own charm and can be tailored in size, finish, or function depending on your space and style.

Wooden Boat-Shaped Stationery Holder


A wooden boat-shaped stationery holder is a charming and functional desk accessory that brings a coastal or nautical vibe to your workspace. Shaped like a small boat, this holder is designed to organize pens, pencils, paperclips, and other essentials while adding a unique decorative touch.

Why Make a Wooden Boat-Shaped Stationery Holder?

This project combines creativity with usefulness. It’s perfect for sea lovers, kids’ study tables, or anyone looking to make their desk more fun and tidy. The boat shape makes it not only a storage solution but also a delightful conversation piece.

General Steps to Build a Wooden Boat-Shaped Stationery Holder

  1. Choose Your Wood – Use soft woods like pine or poplar for easy shaping, or hardwoods like oak for a refined finish.

  2. Sketch the Boat Design – Plan the layout with compartments inside the boat-shaped base.

  3. Cut the Boat Shape – Use a scroll saw or jigsaw to cut out the main boat outline and interior dividers.

  4. Assemble the Compartments – Glue or nail the inner dividers to organize different types of stationery.

  5. Smooth and Finish – Sand the entire piece and apply a finish or paint for durability and style.

  6. Optional Details – Add oar-shaped dividers, tiny sails, or engraved names for personalization.

Creative Ideas for a Wooden Boat-Shaped Stationery Holder

  • Mini Sailboat Version – Include a small sail or mast made from wood or fabric.

  • Name Engraving – Personalize it with a name or message on the side of the boat.

  • Wave Base – Carve the bottom to look like it’s floating on waves.

  • Two-Level Deck – Create a layered design with a top “deck” for small items like clips or erasers.

  • Natural Finish or Painted Theme – Leave it raw for a rustic feel or paint it in navy, white, or colorful boat patterns.

Conclusion

A wooden boat-shaped stationery holder adds creativity, organization, and personality to any desk. It’s fun to make, eye-catching, and useful for keeping things tidy.

Wooden Curve-Based Coffee Table


A wooden curve-based coffee table is a stylish and functional addition to any living space. With its flowing, organic design, this table offers a modern yet natural look that stands out from traditional straight-edged furniture. Whether featuring smooth, curved legs, a wave-like tabletop, or a sculptural base, this piece brings elegance and warmth to your home.

Why Make a Wooden Curve-Based Coffee Table?

This project blends aesthetics with craftsmanship, making it perfect for those who appreciate artistic woodworking. The curved base not only adds visual appeal but also enhances structural stability. Whether for a contemporary living room, a minimalist home, or a rustic space, this table complements various interior styles.

General Steps to Build a Wooden Curve-Based Coffee Table

  1. Choose Your Wood – Opt for sturdy hardwoods like walnut, oak, or ash for durability and a refined finish.

  2. Design the Curved Base – Sketch a flowing, curved leg or base structure that balances aesthetics and function.

  3. Cut the Wooden Curves – Use a jigsaw, CNC router, or steam-bending technique to create smooth curves.

  4. Assemble the Base – Secure the curved wooden pieces using strong joinery techniques like dowels or mortise-and-tenon joints.

  5. Prepare the Tabletop – Choose a rectangular, oval, or organically shaped wooden top to match the curved base.

  6. Smooth and Finish – Sand the entire piece to remove rough edges, then apply stain, varnish, or a natural oil finish for protection.

  7. Final Assembly – Attach the tabletop securely to the curved base for a stable structure.

Creative Ideas for a Wooden Curve-Based Coffee Table

  • Wave-Inspired Design – Create an elegant wave-like base for a flowing aesthetic.

  • Twisted Legs – Use steam-bent or laminated wood to form spiral or twisted legs.

  • Glass and Wood Combo – Pair a curved wooden base with a glass tabletop for a modern look.

  • Nested Design – Make two curved coffee tables that fit together as a set.

  • Storage Feature – Incorporate hidden compartments or a lower curved shelf for added functionality.

Conclusion

A wooden curve-based coffee table is both an art piece and a practical furniture item. Its fluid shape and craftsmanship make it a stunning centerpiece for any room. 

Wooden simple dog frame


A wooden simple dog frame is a beautiful and heartfelt way to display pictures of your beloved pet. Designed with a minimalist touch, this frame can be shaped like a dog silhouette, paw print, or simply feature engraved details that highlight a pet-loving theme. Perfect for dog owners and pet lovers, it makes a great home décor piece or a thoughtful gift.

Why Make a Wooden Simple Dog Frame?

This project is a wonderful way to celebrate and cherish a pet’s memories. Whether used for a favorite photo, a pet adoption certificate, or even a paw print keepsake, a wooden dog-themed frame adds warmth and personality to any space.

General Steps to Build a Wooden Simple Dog Frame

  1. Choose Your Wood – Use pine, oak, or walnut for a smooth and durable finish.

  2. Cut the Frame Shape – Decide on a rectangular, circular, or custom dog-shaped design and cut the frame accordingly.

  3. Add Dog-Themed Details – Carve a silhouette of a dog, engrave a paw print, or attach wooden cutouts of a bone or dog ears.

  4. Create the Photo Slot – Make a cutout in the center for inserting the picture.

  5. Sand and Smooth – Ensure the edges are polished and free from rough surfaces.

  6. Apply a Finish – Stain, paint, or leave it natural to match your desired style.

  7. Add a Stand or Wall Hook – Attach a wooden stand for tabletop display or a hook for wall mounting.

Creative Ideas for a Wooden Simple Dog Frame

  • Paw Print Cutout – A frame with a paw print-shaped opening for the photo.

  • Dog Breed Silhouette – Customize the frame to match a specific dog breed.

  • Personalized Engraving – Add the pet’s name or a meaningful quote like "Best Friend Forever."

  • Double-Layered Frame – Use two layers of wood for added depth and a stylish 3D effect.

  • Magnetic Photo Holder – Replace the traditional glass slot with a magnetic cover for easy photo changes.

Conclusion

A wooden simple dog frame is a timeless way to showcase cherished moments with a furry friend. Whether placed on a desk, wall, or shelf, it adds warmth and sentiment to any home.

A Wood wall-mounted dolphin art with key ring


A wood wall-mounted dolphin art with a key ring holder is a creative way to combine aesthetics with practicality. This design serves as both a decorative wooden sculpture and a handy spot to keep keys organized. Perfect for ocean lovers, coastal homes, or anyone who enjoys artistic wooden décor, it adds a touch of nature-inspired beauty to any entryway or wall space.

Why Make a Wood Dolphin Wall Art with a Key Ring Holder?

This project offers both visual appeal and everyday usefulness. The dolphin shape adds a sense of movement and elegance to your space, while the key hooks ensure that your keys are always easy to find. It’s a great woodworking project that combines carving, engraving, and functional design.

General Steps to Build a Wooden Dolphin Wall Art with Key Ring Holder

  1. Choose Your Wood – Use high-quality wood like walnut, oak, or pine for durability and natural beauty.

  2. Cut the Dolphin Shape – Sketch and cut out a dolphin silhouette using a jigsaw or laser cutter.

  3. Add Artistic Details – Carve or engrave textures to enhance the dolphin’s shape and features.

  4. Attach Key Hooks – Secure small metal or wooden pegs at the bottom for hanging keys.

  5. Sand and Finish – Smooth all edges and apply stain, paint, or a natural wood finish.

  6. Mounting Setup – Install wall hooks or a keyhole bracket for easy wall attachment.

Creative Ideas for a Dolphin Wall Art Key Holder

  • 3D Layered Design – Create a multi-layered dolphin for added depth.

  • Wave Background – Carve a wave pattern behind the dolphin for an oceanic feel.

  • Personalized Engraving – Add names, dates, or a favorite quote about the sea.

  • Glow-in-the-Dark Details – Use luminescent paint for a night-time ocean glow.

  • Magnetic Key Holder – Embed hidden magnets to hold keys without visible hooks.

Conclusion

A wood wall-mounted dolphin art with key ring holder is a functional yet artistic home accessory that brings a touch of marine beauty to any space. Whether crafted as a personal project or a thoughtful gift, this unique piece adds both charm and convenience.

Wooden Soccer Ball Coaster


A wooden soccer ball coaster is a perfect blend of functionality and sports-inspired design. This coaster protects surfaces from drink stains while adding a stylish touch for soccer fans. Whether used at home, in a sports café, or as a gift for soccer lovers, it’s a unique and practical addition to any space.

Why Make a Wooden Soccer Ball Coaster?

This project is simple yet creative, making it a great woodworking project for beginners and experienced crafters alike. The engraved or carved soccer ball pattern adds a personalized and sporty aesthetic while maintaining the warmth of natural wood.

General Steps to Build a Wooden Soccer Ball Coaster

  1. Choose Your Wood – Use durable, water-resistant wood like bamboo, maple, or walnut.

  2. Cut the Coaster Shape – Cut circular or hexagonal pieces using a saw or laser cutter.

  3. Engrave or Carve the Soccer Ball Design – Use a laser engraver or hand tools to etch the classic soccer ball pattern.

  4. Sand and Smooth – Ensure the coaster has a polished and even surface.

  5. Apply a Protective Finish – Use a waterproof sealant or food-safe oil to enhance durability.

  6. Add Non-Slip Feet (Optional) – Attach rubber pads underneath for better grip.

Creative Ideas for a Wooden Soccer Ball Coaster

  • Custom Engraving – Personalize with a name, team logo, or jersey number.

  • Stackable Set – Create a set of multiple coasters with a holder.

  • Dark and Light Wood Contrast – Use different wood tones to highlight the soccer ball pattern.

  • LED-Edge Glow – Incorporate an LED strip around the edge for a modern look.

  • Hexagon Shape – Make the coaster hexagonal to match the soccer ball’s pattern.

Conclusion

A wooden soccer ball coaster is a stylish and functional way to showcase a love for soccer. Whether as a handmade gift, a sports-themed accessory, or part of a home décor set, this project is simple yet impactful. Would you like any specific size or engraving details for your design?

Wooden Basketball Hoop Trash Ca


A wooden basketball hoop trash can is a creative and entertaining way to encourage tidiness while adding a sporty touch to any space. Perfect for kids' rooms, offices, or game rooms, this design turns throwing away trash into a fun activity.

Why Make a Wooden Basketball Hoop Trash Can?

This project is a great combination of function and playfulness. It’s ideal for basketball lovers and helps make cleaning up more engaging, especially for kids. Plus, it’s a unique decor piece that stands out in any room.

General Steps to Build a Wooden Basketball Hoop Trash Can

  1. Choose Your Wood – Use plywood, MDF, or solid wood for a sturdy frame.

  2. Create the Trash Bin Structure – Build a box or circular frame to hold a trash bag.

  3. Attach the Basketball Hoop – Secure a wooden or metal hoop above the bin opening.

  4. Add a Backboard – Cut and attach a wooden backboard for an authentic basketball look.

  5. Smooth and Finish – Sand all edges and apply paint or wood stain for durability.

  6. Decorate – Add basketball-themed details like a painted court design or team logos.

Creative Ideas for a Wooden Basketball Hoop Trash Can

  • Wall-Mounted Version – Attach it to a wall with a removable bin below.

  • Mini Scoreboard – Add a fun counter that tracks how many "shots" were made.

  • Foldable Hoop – Make the hoop foldable for space-saving convenience.

  • LED Lighting – Install motion-activated lights for a cool effect.

  • Custom Colors – Paint it in team colors or a classic orange and black basketball theme.

Conclusion

A wooden basketball hoop trash can is a fun, interactive way to keep spaces tidy while embracing a love for basketball. Whether used in a kid’s room, an office, or a sports-themed space, it’s a functional yet playful addition to any environment. Would you like a specific size or additional features, such as a net or a ball return system?

A wooden sunglasses holder with three compartments


A wooden sunglasses holder with three compartments is a practical and stylish way to store and display your eyewear. Whether placed on a desk, dresser, or entryway table, this organizer keeps sunglasses easily accessible while preventing scratches and damage.

Why Make a Wooden Sunglasses Holder with Three Compartments?

This project is perfect for those who own multiple pairs of sunglasses and want an elegant storage solution. It helps keep eyewear neatly arranged, making it easy to grab the right pair for any occasion. Plus, it’s a simple yet rewarding woodworking project!

General Steps to Build a Wooden Sunglasses Holder

  1. Choose Your Wood – Use solid wood like oak, walnut, or bamboo for durability and a polished look.

  2. Cut the Pieces – Cut wooden panels for the base, sides, dividers, and back.

  3. Assemble the Frame – Attach the side panels to the base, ensuring stability.

  4. Create Three Compartments – Insert two wooden dividers evenly spaced within the frame.

  5. Sand and Smooth – Round the edges and ensure a splinter-free surface.

  6. Apply a Finish – Use wood stain, paint, or a natural sealant for protection.

  7. Add Final Touches – Optional features include a soft felt lining, engraved labels, or a folding lid.

Creative Ideas for a Sunglasses Holder

  • Wall-Mounted Version – Attach the holder to a wall for a floating display.

  • Tilted Design – Create angled compartments for better visibility and easy access.

  • Engraved Names – Customize with initials or labels for each section.

  • Glass Top Lid – Add a transparent lid for dust protection while keeping visibility.

  • Multi-Use Storage – Include a small drawer for accessories like cleaning cloths or cases.

Conclusion

A wooden sunglasses holder with three compartments is a functional and stylish project that adds organization to any space. Whether crafted for personal use or as a gift, it’s a great way to keep eyewear safe and neatly arranged. Would you like a specific design style, such as minimalist or rustic?